Letterboxing Video for DVD Authoring
Chris writes, "We have tried Sonic and Roxio to transfer our digital camera movies to DVD. The movies burn to DVD OK, but when we play in our DVD player on TV screens, the movies are pixilated and not clear... is there some way to correct this problem? If I am understanding the 160 box in the bottom of the camera's movie screen window, our recording pixels may be set at 160 x 120 (compact). Any hope for making to big screen? Or is there a way for the video to only play at 1/4 the size instead of full screen - thereby hopefully keeping integrity of video?
160x120 video is never going to look good on a television screen. The resolution is simply too low. What Sonic does when it authors a standard definition DVD is size the video to fit at a standard full screen NTSC television (or PAL television if you're authoring a PAL disk). That means your 160x120 video is getting stretched to approximately 4 times it's original size. You're on the right track with attempting to play the video at 1/4 the size of full screen, but you need some additional tools to make it work.
The solution to the problem is to add a black border around the video to pad it to an optimal size prior to authoring the DVD. To do this, you'll need two tools I frequently mention here: VirtualDubMod and AVISynth. We're going to use the tools to create black bars all the way around the video to center it on the screen and force the DVD authoring software to maintain the video at it's proper size.
Required Software:
After installing both applications, follow the directions below specific to your video file format.
Putting Borders Around an AVI
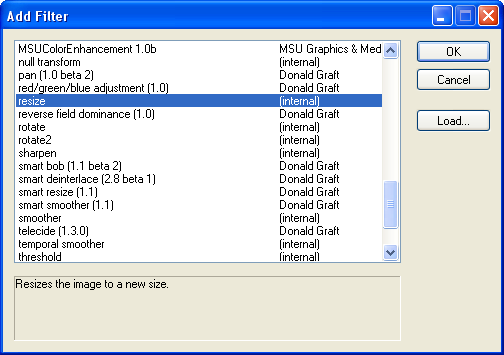
If your source file is an AVI, you can force a border within the VirtualDubMod application directly (or with VirtualDub). Open your AVI file in VirtualDubMod and choose Video > Filters from the menu. Click the Add button and choose the resize filter from the list.
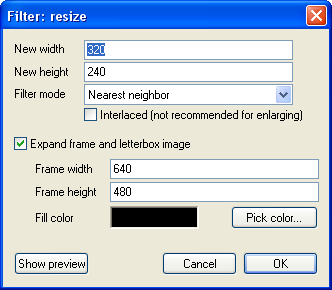
On the filter configuration window, leave the original width and height unchanged. Check the box to Expand frame and letterbox image, setting the new Frame width to 640 and the new Frame height to 480. Click OK when you are finished.
Save the file by choosing File > Save As from the menu. When finished open your favorite DVD authoring app and import the AVI you just created with VirtualDubMod and make a DVD.
Putting Borders Around WMV, Real and other Formats
Other formats, like WMV, ASF, MP4 and Real require AVISynth to add a border around the video. This will help you import those files, add a border, and save an AVI you can use in your DVD authoring software.
Note: If you need to add a border around a MOV file, you need to convert the MOV to AVI before attempting to add a border.
Open notepad and type the following, replacing C:\yourfile.wmv with the path to your video:
For 160x120 video use:
AddBorders(DirectShowSource("C:\yourfile.wmv"), 240, 180, 240, 180)
For 320x240 video use:
AddBorders(DirectShowSource("C:\yourfile.wmv"), 160, 120, 160, 120)
Save your notepad file as yourfilename.avs (where yourfilename is whatever you call the file).
If you need to convert a bunch of files, I included AVISynth templates in the VirtualDubMod download.
Open the .avs file you just created in VirtualDubMod. After you add a border around your video with VirtualDubMod save the file as an AVI. Import the AVI you just created into your DVD authoring software and burn a DVD that respects the original resolution of your video.
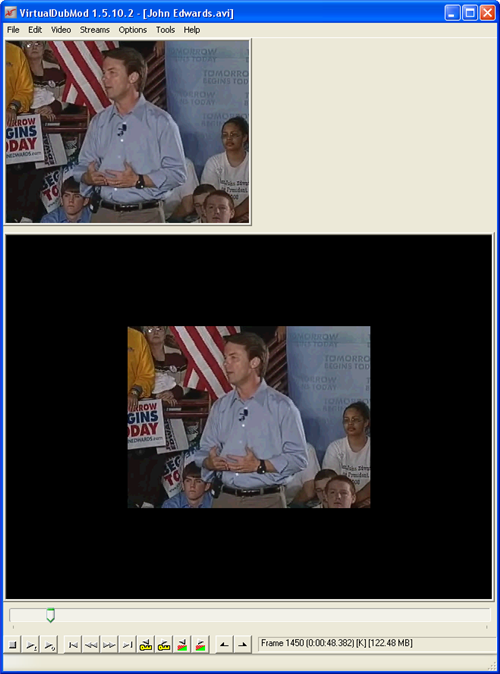
Here's a before and after show of the video with border in VirtualDubMod.
For more on using VirtualDubMod and AVISynth with video projects see these other tutorials:
Reversing a video clip to play it backwards
Convert PAL to NTSC with VirtualDubMod
How to Convert RMVB with VirtualDubMod