Converting DVD to Pocket PC WMV Part 1
There are plenty of applications available on the Internet for ripping DVDs and putting them on your hard drive. Many of these tools are illegal in the United States and other countries because they use technologies designed to defeat CSS and Macrovision protection. There are also plenty of legal reasons for ripping DVDs, like making training videos available for streaming on a corporate network, converting movies you burned to DVD back to a format available for use on a PC, or sharing material you own the copyright to in a different format.
There are plenty of applications available on the Internet for ripping DVDs and putting them on your hard drive. Many of these tools are illegal in the United States and other countries because they use technologies designed to defeat CSS and Macrovision protection. There are also plenty of legal reasons for ripping DVDs, like making training videos available for streaming on a corporate network, converting movies you burned to DVD back to a format available for use on a PC, or sharing material you own the copyright to in a different format.
Rather than making this tutorial a pointless exercise in what should be legal versus what is currently legal, I'm going to assume going into this that you've done your homework on getting video files off of a DVD and are now interested in being able to use those files for some other purpose. If you haven't, do a quick Google search for DVD Ripping and come back when you have the VOB files on your hard drive.
Software Required:
FlasKMPEG to convert VOB files to AVI
Windows Media Encoder to convert AVI files to WMV
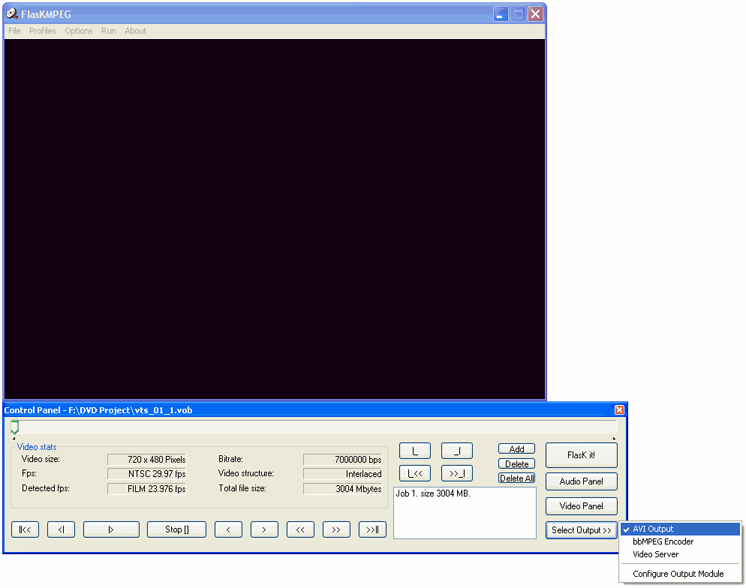
Since most DVD ripping tools break large DVD files into several smaller VOB chunks, I'm currently using FlasKMPEG version 0.78.39, which automatically recombines all the VOB files to form a complete movie during the VOB to AVI conversion process. The disadvantage to version 0.78.39 is it doesn't use an installer, so everything lives in the folder you unzipped it to.
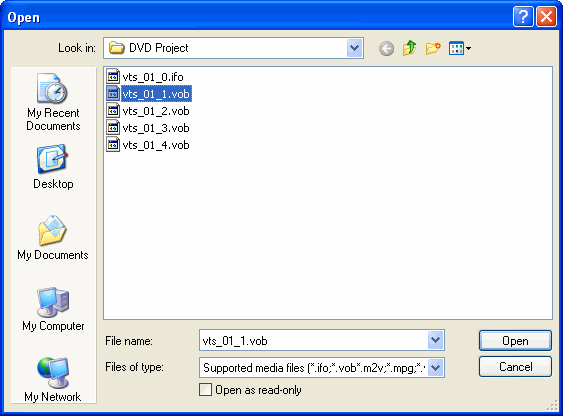
After launching FlasKMPEG by clicking on the .exe, open your video file from the File > Open menu.
At this point in the process we will output the highest quality AVI file possible, so we will keep the video the same aspect ratio as the original.
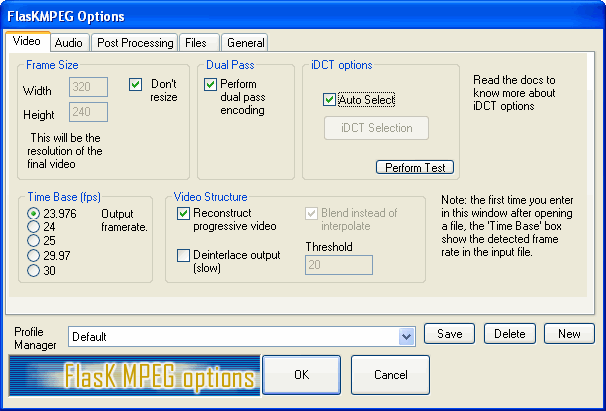
Go to Options > Advanced Options to configure settings for the AVI file.
On the video tab make sure Don't resize is checked. Check Perform dual pass encoding, which takes slightly longer but results in a better quality video file. Leave the output framerate and video structure set on the defaults.
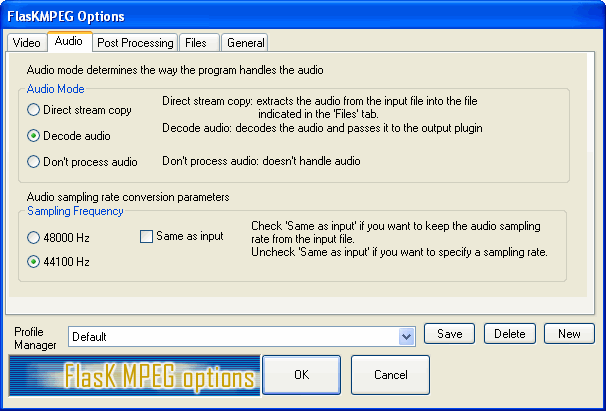
Click the Audio tab and choose Decode Audio and 44100 Hz.
Leave the default settings on the Post Processing tab.
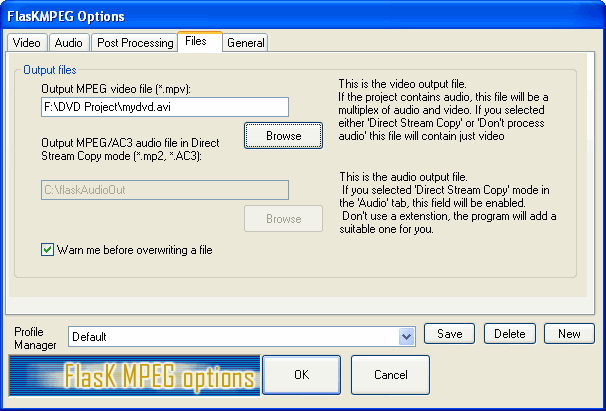
On the files tab, name the file and choose a location to save the output Click OK when you are finished.
From the select output button, make sure the AVI Output option is selected. Click Configure Output Module to choose the audio and video codecs used to process the AVI output.
My best success is using the Microsoft MPEG-4 Video Codec V1 for video and << Uncompressed PCM Audio >> for the audio codec. Accepting the defaults seems to produce great video for me. At this point, FlasKMPEG will process the VOB files and output an AVI file. Plan on processing time to be approximately as long as the playtime of video file you are converting.
Click Save and Close when you are finished.