Audio J-Cuts in Windows Movie Maker
If you ever watch sitcoms on network television, you've seen a J-cut in action. The characters in the show comment on plans to meet for dinner somewhere. A traveling exterior shot breezes through the streets of New York before framing the exterior shot of a restaurant. Dull metal on ceramic sounds of knife and fork contacting plate as someone slices the steak in front of them play as the camera lingers on the storefront. A conversation begins as the scene dissolves to the characters engaged in mid-meal dialogue.
This setup subtly tells you a number of things about the story unfolding. You know they left the previous scene. You know they traveled outside to get to the restaurant. And it leaves room for the characters to have a conversation about the cab ride to the restaurant, without needing to act it out on screen.
You just witnessed a J-cut in action. J-cut refers to any audio transition where audio from the upcoming scene plays as the video from the current scene continues to run. You can use a similar trick to compress the timeline of your own video without losing any of the story.
For instance, if you record a Little League game, you could show the fielding team running out from the dugout onscreen, play audio from the announcement of your son as the lead-off batter and dissolve to him at the plate, compressing the downtime that takes place as the kids dig around in the dugout locating batting helmets and bats for their turn at the plate.
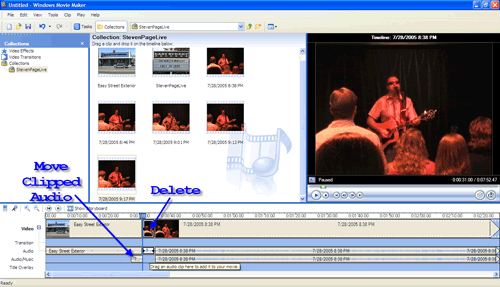
To create a J-cut, drag the two movie clips you want to edit to your video timeline. Drag another copy of the second movie clip number to the Audio/Music section of the timeline, matching it up with the version on the video timeline.

Select the second clip in the timeline, drag the slider to the point where you want the video from the second clip to start playing and use the Split button to divide the clip at that point. Make an identical split in the clip on the Audio/Music Timeline. If you can't get the exact spot you want to line up using your mouse to position the slider, use the Previous Frame and Next Frame buttons to tweak your settings for a more accurate position.
Slide the Audio/Music clip over so the end of the clip lines up with the end of the first video clip. You may need to zoom in on the time line for a perfect match up.

Once this section of audio is moved, delete the fragment from the second video clip from the timeline. Slide the remainder of the Audio/Music clip over to eliminate the gap between clips.
If you haven't already done so, expand the Video on the timeline to show the Audio and Transition sections. Right-click the Audio clip associated with your second video clip and Mute it to eliminate duplication of the audio between tracks.
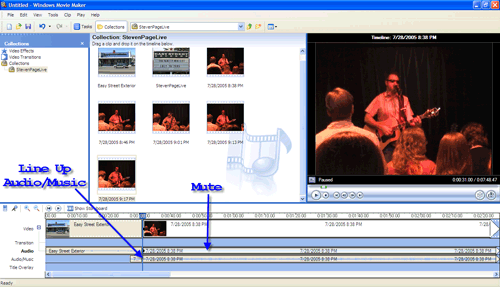
To further make the transition between video clip one and video clip two, you may want to split video clip one at the point where the Audio/Music track starts and fade the audio associated with the video clip.
If you add a transition between your two video clips, be sure to account for the offset created as the software overlaps the two clips to make the transition.
Note: If you prefer not to clip the Audio/Music track, keep track of the exact minute:second:fraction where video clip two was split and slide the Audio/Music track over an equivalent number of seconds to keep it in sync with the video. If you use transitions, this particular strategy can get messy because you also have to factor in the offset for the transition.