Import AVCHD to Sony Vegas Movie Studio HD
AVCHD camcorders have become the norm for most camcorder manufacturers, including Canon, Sony and Panasonic. I currently use a Canon AVCHD camcorder for most of my video recording needs. When I recently used the latest version of Sony Vegas Movie Studio HD to edit one of my videos, I realized I had no idea how to import the files from my AVCHD camcorder into Movie Studio HD. The list of import options under the Project menu does not include one for AVCHD. Instead of throwing my computer out the window in frustration, I dug around until I found the solution.
Instead of grouping AVCHD import with the rest of the import options included in the Project menu, Sony hides the feature under the View menu. This could be because importing AVCHD is really just a simple file copy operation, but it's confusing. Before you start your import, be sure you connected your camcorder to your computer via USB and set it into playback mode. Depending on what kind of camcorder you own, you may need to press a button or perform an additional step before your computer will recognize the video camera is connected.
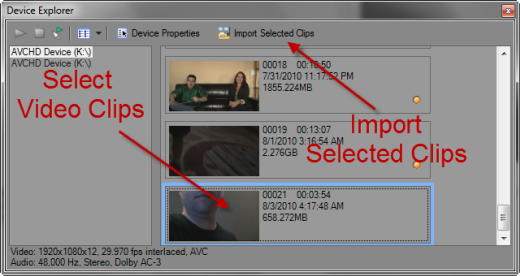
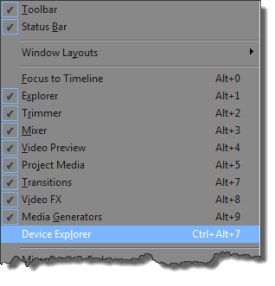 Once your camcorder is connected and ready, go to the View menu and choose Device Explorer from the list of options. This should pop up a window that looks like the one pictured below where you can choose which video clips to import and then click the Import Selected Clips button to transfer the files from your AVCHD camcorder to your hard drive. Depending on how long the video clips are, the file transfer will take a few seconds or several minutes.
Once you finish transferring the files to your computer, you're ready to edit your video.