Apple’s iPhone has a great point-and-shoot digital camera built-in. If you are an iPhone user, for day-to-day photography, you won’t even miss not having your camera. But there’s one thing Apple really needs to improve – image stabilization. If your hands are shaky or you’re trying to capture something in lower light, holding your iPhone in your hands often results in a blurry image. Carrying around a tripod for your iPhone isn’t practical, but there are other ways to get the equivalent of an iPhone tripod and a Steadicam for image stabilization all rolled into one. My personal favorite method is the DIY iPhone bottlecap tripod, combined with an iPhone case with built-in tripod mounting threads. Scroll past the photo to see how you can make your own.

As you can see in the photo above, the DIY iPhone bottlecap tripod is made from a standard soda bottle cap, combined with some hardware available at any Home Depot, Lowes, Ace, or other hardware store in your area. For the iPhone case, I opted for the Canopy Jumba, but any case with threads for a tripod will work just as well. A 20 oz. soda bottle cap or water bottle cap will work on virtually any other bottle, so pick your favorite beverage and get started creating your own iPhone tripod from the bottle cap.
Here’s how to make bottle cap tripod and Steadicam mounts for your own bottle:
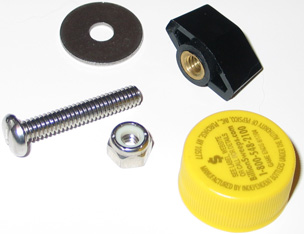 Master parts list:
- 1 1/4-inch Stainless steel washer
- 1 1/4-20×1 1/2-inch stainless steel pan head machine screw
- 1 1/4-20 Bar Knob
- 1 1/4-20 stainless steel lock nut
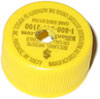
- 1 lid from a 20oz bottle
Tools required:
- Drill with 1/4-inch bit
- Screwdriver
- Wrench
All parts for the project were purchased at Lowes. Total cost of tripod parts is $3.37 (excluding Mountain Dew).
 Step 1: The first step in how to make a bottle cap tripod is to drill a hole in the center of the bottle cap using a 1/4-inch drill bit. This is the hole you will use to pass the mounting screw through to mount your iPhone on the bottle cap.
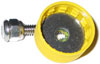 Step 2: Insert the washer in the top of the bottle cap. Adding a washer helps stabilize the bottle cap and will result in it lasting longer through repeated use.
 Step 3: Insert the screw in the bottle cap, until the pan head of the screw is flush against the washer you added in step 2.
 Step 4: Tighten the lock nut onto the screw until it secured against the top of the bottle cap. The lock nut prevents the machine screw from turning while connecting your iPhone case to the tripod.
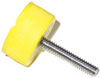
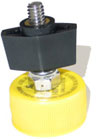 Step 5: Twist the bar knob on the screw until it’s flush against the top of the bottle cap. This step is optional, but I found it was easier to get a stable mounting by adding this additional piece. Another alternative is to use a shorter screw. By switching the screw I used with a 1/4-20 x 1-inch screw, you should still be able to complete all the steps here while leaving less of the screw exposed. Just to be safe, if you go with the shorter screw route, I recommend getting both a 1-inch and 1 1/4-inch screw, so you don’t have to make two trips.
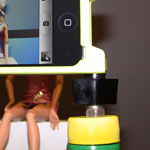 Step 6: Connect your DIY iPhone tripod to the base of the camera, then screw the cap down on the bottle. The bottle should be half full at a minimum to counterbalance the weight of the camera. In general, using a full bottle will help improve stability
You can also use the DIY bottle cap tripod for digital camera hardware and the Flip video camera.